
The setup mode can be used to change the configuration settings such as: access code, channel number, transmitter time-out, backlight time-out and more.
Entering Setup Mode
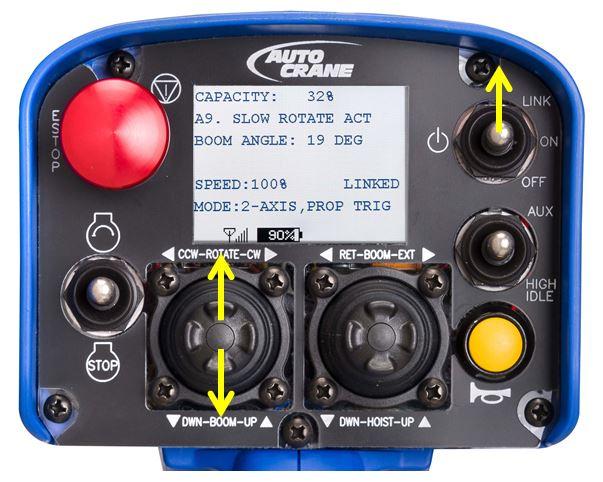
Enter the Setup Mode by starting with the remote power switch in the Off position and the E-Stop switch raised. Hold the power switch in the Link position for several seconds until the remote shows Entering Setup Mode. Release the power switch to the On position. You are now in the Setup Mode.
Navigating through the Setup Mode is accomplished by using the Link switch and the left joystick in the up/down direction. The Link switch toggles between the menu and parameter settings. The left joystick cycles through the menu or changes the setting of the parameter.
If there is a password set, enter the four digit password.
NOTE: No parameter changes will be saved until the Save and Exit is selected.
Adjusting Settings
The following sections are various menus which have parameter settings.
Access Code
The access code determines which receiver is controlled by a remote. The access code must match the receiver in order to establish the communication link.
Determine the access code and channel number of the receiver by watching the boot-up screen of the receiver during power-up. The access code and channel number of the remote can be similarly be determined by observing the boot screens or you can hold the Link switch while pressing the Horn when the remote is in the Run Mode.
Use the Link switch and left joystick to set the access code. The Link switch steps through each digit and then back to the menu each time the Link switch is toggled. The joystick increments or decrements the number. The access code is a 5 digit value.
NOTE: There is no default value.
Channel
The channel determines which frequency the remote communicates with the receiver. Channels 1-32 are available settings.
NOTE: There is no default value.
RF Power
The RF Power settings determines the output power of the remote. Battery life is not noticeably improved by using Min Power. However the range of communication is affected.
NOTE: The default value is Max Power.
Transmitter Timeout
The Transmitter Timeout setting controls the amount of time the remote remains active from the last button press until it automatically shuts-off. The timeout can be set from 0 (disabled) up to 60 minutes.
Auxiliary functions such as an air compressor will remain on even after the remote times-out.
NOTE: The default value is 15 minutes.
Backlight Power
The Backlight Power setting adjusts the LCD backlight brightness and can be set from 0% (off) to 100% in 5% increments.
NOTE: The default value is 100%.
Backlight Timeout
The Backlight Timeout setting controls the amount of time since the last button press until the Backlight Power is momentarily switched to 0% (off) to save battery life. The setting can range from 1 to 30 seconds and Always On. Using the Always On setting decreases battery life by approximately 10% of the total time.
NOTE: The default value is 30 seconds.
Set Clock
The Set Clock function is for the system clock and has no effect on the functionality. The format is MM/DD/YY hh:mm:ss.
Password Enable
The Password Enable setting determines if a password is required to enter the Setup Mode.
NOTE: The default is no password enabled.
Change Password
A 4-digit password can be set to enter the Setup Mode.
NOTE: The default value is 0000.
IR Configuration Receiver
The IR Config Receiver is used by the factory to automatically setup the Channel and Access Code to match.
Position the remote and receiver within one foot of each other to ensure a successful exchange of information via IR. Point the red IR window located on the bottom of the remote at the receiver you wish to link and momentarily press the Link switch. The screen will display Attempting with a countdown of the time while scanning for the receiver’s IR signal. If the receiver is in range and the IR link is made, the message will change to Success and the Access Code and Channel will be changed to match the receiver.
If the link is not established, the screen will display Failed and the Access Code and Channel will not be changed.
The IR configuration function only works if the project ID is the same number. If the project numbers do not match, an error code will be display and you must set the Access Code and Channel numbers manually.
NOTE: The changes to the Access Code and Channel will not be saved until Save and Exit is selected.
Battery Type
The battery type should always be set to Alkaline. The rechargeable battery type is not supported by Auto Crane at this time.
NOTE: The default setting is Alkaline.
Exit Without Save
If you do not wish to save any configuration changes, select Exit Without Save. The remote will start in the operation mode using the last saved configuration settings.
Save and Exit
Selecting this option saves all changes and exits the Setup Mode. Upon exit, the remote will start using the new configuration settings.
For questions or concerns please contact our customer service group at 800.777.2760 or 918.438.2760.
Last Update: June 19, 2017
Tell us how can we improve this post.
Log In is required for submitting new question.
